Cat's Guide to C++ | SFML | Background Image in Fullscreen | Visual Studio 2019 | Level 1
This tutorial will focus on displaying a background Image in Fullscreen with SFML. The screen size I am using for this tutorial is 1920px x 1080px, which is a full HD resolution.
Note - 1: This tutorial does not cover how to set up Visual Studio 2019 for SFML. If you do not know how to use SFML with Visual Studio, this tutorial of mine (Cat's Guide to C++ | SFML | Setup | Visual Studio 2019 | Level 0) walks through what you need to know.
Note - 2: This tutorial assumes that you know the basics of C++. If you are not familiar with C++, this tutorial of mine (Cat's Guide to C++ | Output and Input in C++ | Visual Studio Code | Level 0) goes over the fundamentals.
Contents:
1. Creating a New Project
2. Adding an Image File
3. Opening and Closing the Window
4. Creating a Background Texture and Sprite
5. Displaying the Background
1. Create a New Project
Open up your Visual Studio 2019, and click on 'Create a new project' button.
 |
| Create a new project button |
The button will take you to a list of project templates. Choose the 'Console App' template if you did not create a custom template for your SFML projects.
 |
| Console App Template Button |
Once you select a template, You will see the 'Configure your new project' page. In here, name your project 'BackgroundImage', choose where you would like to save your project under 'Location,' and click the checkbox for 'Place solution and project in the same directory.'
After configuring your project, click the 'Create' button.
 |
| Configure Your New Project Page |
Before you can start using SFML in your project, you need to link it with SFML. Make sure you:
1. Add a SFML Include Directory
2. Add a SFML Library Directory
3. Add SFML Dependencies
4. Add SFML .dll files.
If you need help with linking SFML to your Visual Studio, read this tutorial: Cat's Guide to C++ | SFML | Setup | Visual Studio 2019 | Level 0.
2. Add an Image File
Find your project folder, which should be named 'BackgroundImage.' You set the location of this folder in '1. Create a New Project.' Add a new folder named 'graphics' inside 'BackgroundImage.'
In 'graphics' folder, add a 1920px x 1080px image (jpg or png).
If you do not have a 1920px x 1080px image you would like to use for this exercise, you can download my background image from below:
 |
| Background Image |
3. Opening and Closing the Window
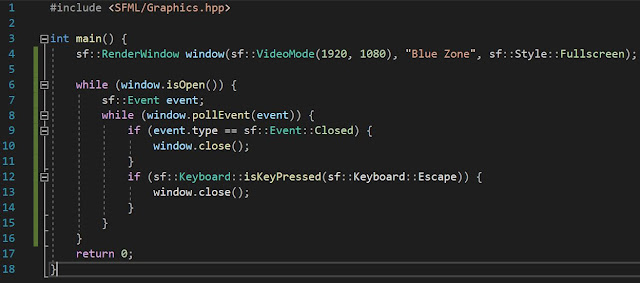
To display the background image, you first need a window to display it on. Go to the code file with 'main()' to create your window. If you cannot find this file, look under 'Source Files' in the 'Solution Explorer.'
 |
| The Solution Explorer |
int main() {
return 0;
}
 |
| Code Snippet - 1 |
4. Creating a Background Texture and Sprite
It's time to create a texture and a sprite to display on the window.
Inside 'main()', right after sf:: RenderWindow window(sf::VideoMode(1920, 1080), "Blue Zone", sf:: Style::Fullscreen);, write the following code:
textureBlueZone.loadFromFile("graphics/blue-zone.jpg");
This code creates a texture named textureBlueZone, and loads the image file in it with loadFromFile(). The name of my texture is textureBlueZone because my image is named Blue Zone. If you have an image named Field, you could name your texture like this: sf::Texture textureField;
loadFromFile("graphics/blue-zone.jpg")will load from a file inside a graphics folder inside the folder where the C++ source file is. My code says "graphics/blue-zone.jpg" because I want a file named blue-zone.jpg in the graphics folder. If you have a different file such as field.png, you should write "graphics/field.png". Make sure you type the correct file name including the extension after graphics/.
After the last two lines of code, write:
spriteBG.setTexture(textureBlueZone);
spriteBG.setPosition(0, 0);
This group of code creates a sprite named spriteBG (short for sprite background), and sets its texture as textureBlueZone (spriteBG.setTexture(textureBlueZone);). It also sets the position of spriteBG to x = 0 and y = 0 (spriteBG.setPosition(0,0)).
x = 0 and y = 0 is the upper left hand corner of the screen. The default origin of an image in SFML is also x = 0 and y = 0 , which is the upper left hand corner of the image. By setting the position of the sprite to x = 0 and y = 0, you can make sure that all of your 1920px by 1080px image shows on your 1920px by 1080px window.
 |
| SFML 1920 x 1080 Window Coordinates |
| Code Snippet - 3 |
5. Displaying the Background
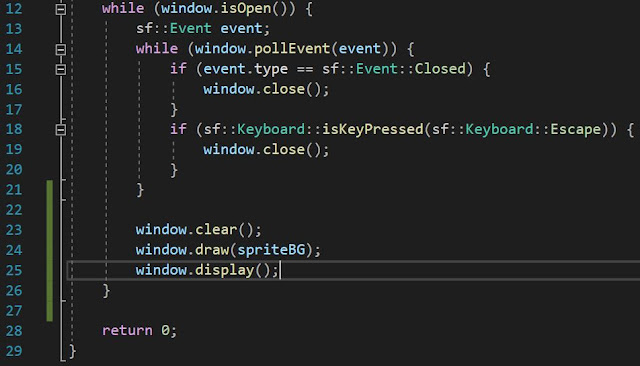
Try running your code now with the Local Windows Debugger in Visual Studio. You should see your image in fullscreen mode.


Comments
Post a Comment