Cat's Guide to C++ | SFML | Countdown Timer | Visual Studio 2019 | Level 3
This tutorial will focus on displaying a countdown timer with SFML. The timer will show seconds and milliseconds.
Note - 1: This tutorial does not cover how to set up Visual Studio 2019 for SFML. If you do not know how to use SFML with Visual Studio, this tutorial of mine (Cat's Guide to C++ | SFML | Setup | Visual Studio 2019 | Level 0) walks through what you need to know.
Note - 2: This tutorial assumes that you know the basics of C++. If you are not familiar with C++, this tutorial of mine (Cat's Guide to C++ | Output and Input in C++ | Visual Studio Code | Level 0) goes over the fundamentals.
CONTENTS
1. Creating a New Project
2. Adding Font File
3. Opening and Closing the Window
4. Displaying Text
5. Creating the Timer
1. CREATING A NEW PROJECT
A. Open up your Visual Studio 2019, and click on Create a new project button.
B. The button will take you to a list of project templates. Select the Console App template or a custom template for your SFML projects, if you have one.
C. Once you select a template, You will see the Configure your new project page.
In Configure your new project:
1. Name your project CountdownTimer
2. Choose where you would like to save your project under Location
3. Click the checkbox for Place solution and project in the same directory.
4. Click the Create button
Note: Remember to link your Visual Studio 2019 project with SFML
2. ADDING A FONT FILE
A. Find or download the font file you would like to use for this project. This file will be used to set the font of the timer. I like to download my fonts at Google Fonts. My font of choice is Shippori Mincho Regular 400.
B. Create a folder named fonts inside your Visual Studio 2019 Project Folder.
C. Add your font file inside the fonts folder you created. Font files' usual file extension is .ttf. If your font file is inside a zipped folder, do not put the zipped folder in your fonts folder. Extract your zipped folder, copy your font file, and paste it in your fonts folder.
3. OPENING AND CLOSING THE WINDOW
A. In your Visual Studio 2019's Solution Explorer, find your c++ source file with a file extension .cpp.
B. Erase everything in your source file, and write #include <SFML/Graphics.hpp> in the first line of the file. You need this line to use SFML's graphics module.
int main() {
return 0;
}
main() is the starting point for c++ applications. If main() returns 0, it means the application was successfully executed.
D. Inside main(), before return 0, write:
sf::VideoMode vm(1920, 1080);
sf::RenderWindow window(vm, "Countdown Timer", sf::Style::Fullscreen);
These two lines of code create a 1920px by 1080px fullscreen window titled Countdown Timer.
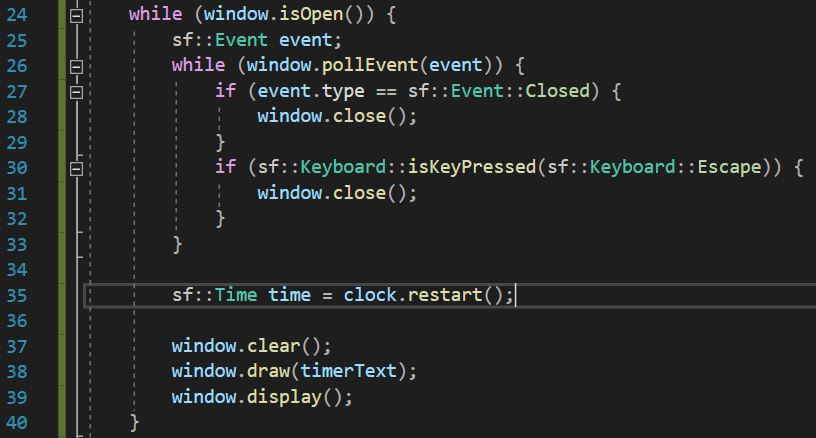
E. Under the code for creating the window, write:
while (window.isOpen()) {
sf::Event event;
while (window.pollEvent(event)) {
if (event.type == sf::Event::Closed) {
window.close();
}
if (sf::Keyboard::isKeyPressed(sf::Keyboard::Escape)) {
window.close();
}
}
}
This group of code will check if there is a request for closing the window while the window is open (while(window.isOpen())). You can close the window (window.close()) with Alt + F4 (event.type == sf::Event::Closed) or with the Escape key (sf::Keyboard::isKeyPressed(sf::Keyboard::Escape)).
4. DISPLAYING TEXT
A. To display text on the window, you first need a place to store your font and your text. Under the code for creating the window and above while (window.isOpen()), write:
sf::Font timerFont; sf::Text timerText;
timerFont is for storing the font, and timerText is for storing the text.
B. After sf::Text timerText;, load your font file to timerFont. Write:
timerFont.loadFromFile("fonts/Your-Font-Name.ttf");
Note: By Your-Font-Name.ttf, I mean the exact name of your font file inside the fonts folder in your project folder. You can copy and paste your file name to avoid typos.
C. Once you load the font file to timerFont, set timerText's font to timerFont. Write:
timerText.setFont(timerFont);
D. Set the string of the font under timerText.setFont(timerFont);. Write:
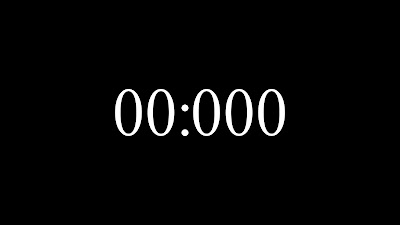
timerText.setString("00:000");
This line of code sets the text of the timerText to 00:000. The first two zeros are place holders for seconds, and the last three zeros are placeholders for milliseconds.
E. After setting the string for timerText, set the size and the color of the text. Write:
timerText.setCharacterSize(300); timerText.setFillColor(sf::Color::White);
This code sets the size of your text to 300, and the color to White.
Note: If you want to try a pink color, this line of code will help: timerText.setFillColor(sf::Color::Magenta);
F. You are ready to display your timerText on the window. Inside while (window.isOpen()), after while (window.pollEvent(event)), write:
window.clear(); window.draw(timerText); window.display();
This group of code clears the window (window.clear();), draws timerText on the window (window.draw(timerText);), and displays the window (window.display();).
G. Let's move the timerText to the middle of the window. After setting the text color and before while (window.isOpen()), write:
sf::FloatRect timerTextRect = timerText.getLocalBounds(); timerText.setOrigin(timerTextRect.left + timerTextRect.width / 2.0f, timerTextRect.top + timerTextRect.height / 2.0f); timerText.setPosition(1920 / 2.0f, 1080 / 2.0f);
The first line of this code stores the dimension of timerText in timerTextRect. In the second line, setOrigin() sets the origin of timerText to its center. In the third line, setPosition() places timerText in the center of the window.
sf::Font timerFont;
sf::Text timerText;
timerFont is for storing the font, and timerText is for storing the text.
B. After sf::Text timerText;, load your font file to timerFont. Write:
timerFont.loadFromFile("fonts/Your-Font-Name.ttf");
Note: By Your-Font-Name.ttf, I mean the exact name of your font file inside the fonts folder in your project folder. You can copy and paste your file name to avoid typos.
C. Once you load the font file to timerFont, set timerText's font to timerFont. Write:
timerText.setFont(timerFont);
D. Set the string of the font under timerText.setFont(timerFont);. Write:
timerText.setString("00:000");
This line of code sets the text of the timerText to 00:000. The first two zeros are place holders for seconds, and the last three zeros are placeholders for milliseconds.
E. After setting the string for timerText, set the size and the color of the text. Write:
timerText.setCharacterSize(300);
timerText.setFillColor(sf::Color::White);
This code sets the size of your text to 300, and the color to White.
Note: If you want to try a pink color, this line of code will help: timerText.setFillColor(sf::Color::Magenta);
F. You are ready to display your timerText on the window. Inside while (window.isOpen()), after while (window.pollEvent(event)), write:
window.clear();
window.draw(timerText);
window.display();
This group of code clears the window (window.clear();), draws timerText on the window (window.draw(timerText);), and displays the window (window.display();).
G. Let's move the timerText to the middle of the window. After setting the text color and before while (window.isOpen()), write:
sf::FloatRect timerTextRect = timerText.getLocalBounds();
timerText.setOrigin(timerTextRect.left + timerTextRect.width / 2.0f, timerTextRect.top + timerTextRect.height / 2.0f);
timerText.setPosition(1920 / 2.0f, 1080 / 2.0f);
The first line of this code stores the dimension of timerText in timerTextRect. In the second line, setOrigin() sets the origin of timerText to its center. In the third line, setPosition() places timerText in the center of the window.
5. CREATING THE TIMER
A. Lets start creating some variables for the timer. You need a variable to store a clock, another one to store the duration of the timer, and another one to store the duration as a string. After setting the position of the text and before while (window.isOpen()), write:
sf::Clock clock;
float duration = 20.0f;
sf::String timerString;
Note: I set the duration to be 20.0f because I wanted a 20 second timer. If you want a 10 second timer, write: float duration = 10.0f;
B. You need to start the clock once the window is open. Inside while (window.isOpen()), under while (window.pollEvent(event)), and above window.clear();, write:
sf::Time time = clock.restart();
This code starts the clock (clock.restart();) and stores the time in variable time.
C. Time to countdown your timer. After starting the clock, write:
if (duration > 0) {
duration -= time.asSeconds();
timerString = std::to_string(duration);
timerText.setString(timerString);
}
If the duration is over 0 (if (duration > 0)), this code countdown the duration as the time passes (duration -= time.asSeconds();). The time is calculated in seconds (time.asSeconds()). The duration is then converted to a string and stored in timerString (timerString = std::to_string(duration);), which is set as the string of timerText (timerText.setString(timerString);).
If you run the program now, you should see the timer counting down. The digits to the left of the period represent seconds, and the digits to the right of the decimal point represents milliseconds.
D. The timer should separate the seconds and the milliseconds with a colon (:). To separate the two, you need variables to hold seconds and milliseconds. After creating variable timerString and before while (window.isOpen()), write:
1. float fMilliseconds, fSeconds;
These two variables are for storing float value of milliseconds and seconds
2. int intMilliseconds, intSeconds;
These two variables are for storing int value of milliseconds and seconds
3. sf::String stringMilliseconds;
This variable is for storing int value of milliseconds in a string format
4. sf::String stringSeconds;
This variable is for storing int value of seconds in a string format
E. Let's separate milliseconds and seconds from the time stored in duration. Inside if (duration > 0), after duration -= time.asSeconds();, write:
fMilliseconds = std::modf(duration, &fSeconds);
This line of code will store the fractional part of duration to fMilliseconds, and its integral part to fSeconds.
F. Convert fMilliseconds and fSeconds to integers. Write:
intSeconds = static_cast<int>(fSeconds);
intMilliseconds = static_cast<int>(fMilliseconds * 1000);
This code converts floating-point numbers to integers with static_cast<int>().
fMilliseconds is multiplied by 1000 to get 3 digit integers.
G. Convert intSeconds and intMilliseconds to strings so that you can use them for string concatenation later.
After intMilliseconds = static_cast<int>(fMilliseconds * 1000);, write:
stringMilliseconds = std::to_string(intMilliseconds);
stringSeconds = std::to_string(intSeconds);
H. Edit timerString so that it stores a concatenation of stringSeconds, colon (:), and stringMilliseconds:
timerString = stringSeconds + ":" + stringMilliseconds;
If you run the program now, you will see the seconds, a colon (:) , and 3 digits of milliseconds.
if (intMilliseconds <= 0) {
stringMilliseconds = "000";
}
J. Reserve two digits for the seconds.
If the intSeconds is a single digit number such as 3, the program should display 03.
If intSeconds is less than or equal to 0, the program should display 00.
After if (intMilliseconds <= 0), write:
if (intSeconds <= 0) {
stringSeconds = "00";
}
else if (intSeconds < 10) {
stringSeconds = "0" + stringSeconds;
}
This code checks if intSeconds is less than or equal to 0, and if it is not, it checks if it is less than 10.
If intSeconds is less than or equal to 0, stringSeconds is set to "00"
If intSeconds is not less than or equal to 0 but is less than 10, stringSeconds is set to "0" + stringSeconds


Comments
Post a Comment